Welcome

Welcome to my blog. I'm glad you stopped by to see what these Musings are all about. Since they're straight off the top of my head, I haven't exactly figured it out myself! We all muddle through each day and, hopefully, we find something to rejoice in as we choose, sort, piece and quilt our beautiful stashes of fabric.
Please visit my website: http://www.judithheyward.com/ to learn more about my quilts. Or contact me at judyheyward@gmail.com if you have any questions or comments. Thanks.

Tuesday, March 22, 2011

Phillipa Naylor

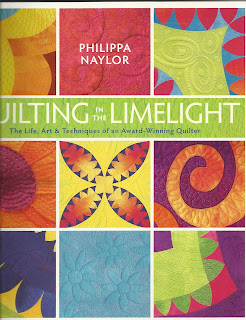
 I had the pleasure this past week of taking two classes from Phillipa Naylor from Great Britain.  Her book--that I have here--is all about piecing curves.  In addition, it tells of her very interesting life in Saudi Arabia, her return to England and her earlier career as a fashion designer and how it impacted her style of working in quilting fabric.  I also attended her lecture where she had some of her gorgeous, PERFECT quilts.
Throughout my two days with her, one thing that really stood out was her willingness to take her time in all of the steps that go into making an award-winning quilt.  I found it so inspiring and also a reminder that, for me at least, it is better to do one quilt really well than to have an entire closet of them done with little thought and caring about the process that makes them special. 
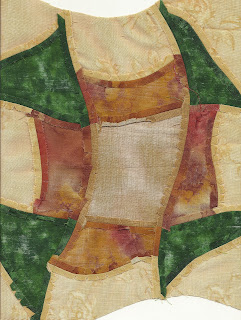
 We just made a sample block in the Curved Piecing class.  She started out with a conventional Churn Dash block and then showed us how to make it curvy.  And then once that was done, she showed us her method of piecing those curves.  I really liked her method.  It called for a lot of preparation before the first seam is ever sewn.  As you can see by my picture of the back side of the block, there is a LOT of "V" snipping and all of the seams are pressed open to achieve a flatness to the finished piece.  She also talked about threads (thinner is better for piecing) and the size of the needle (smaller needle leaves a smaller hole).
It was a great class and I came home with plenty to think about. 
On the second day, we learned her method of machine applique (no pictures).  Again, we did a LOT of hand work before we ever got to the machine work (actually, we didn't get to the machine work except to do some samples of satin stitching around circles). This workshop would have been better if it had been at least two days because there was so much information to hear, assimilate and use.  Phillipa will soon have a book out on this topic and it will absolutely be part of my library.  I plan on finishing the piece that I started and will share it later.  In the meantime, I'm still thinking about all the things that I came home with and how I might use them in my own work.  I know for sure that I'll be pressing more seams open than ever before and precision is always a much sought after skill.  I'm working on it.

Saturday, March 19, 2011

Two Finished Projects

 My last post showed the construction process of this abstract wallhanging that I started in a class with Gloria Loughman.  Well, "started" is somewhat of a loose term because I actually started again from scratch once I got home.  However, the concepts she shared were really great and I came home excited to start again.  I mean, you know how it is--you go to a class thinking you KNOW what it's all about, you have your design in mind (and maybe even have it drawn out)--and then the whole thing is blown away when you find out what REALLY  is going to happen in the class.  I enjoyed the entire process and now I even have another design ready to interpret in fabric--after I finish a couple of other things . . .
 Today at our Art Group, we had our "reveal" in our Zentangle challenge.  It was great.  Our members came up with some really creative zentangles.  Doreen actually made a lampshade with freemotion zentangles, Linda applied her zentangles to a teeshirt, Dotty made two zentangle projects--a beautiful wallhanging and a 3-dimensional piece.  Corky free-motioned zentangles that changed colors as they overlapped--and the list goes on.  They were all so inspiring.  As you can see, I went the 3-dimensional route.  I had seen a picture of an embroidered cat in a catalogue and decided that would work for my project.  I used faux leather and several different kinds of pens.  I also added color.  As I thought through the construction process, I realized I was going to have to insert a zipper because I didn't think that I could sew the opened seam with a hand needle after I finished the stuffing process.  So, I had to draw the outlines for the two back pieces, sew the zipper and THEN draw.  I wanted the cat to be able to stand on it's own, so I figured out how to make a flat bottom and then put a bag of sand in the lower one quarter so it would have stability.  I'll have to say, it was lots of fun and I was glad that it actually turned out the way I had envisioned (well, almost).
Our next challenge is going to be based on a haiku poem--I can hardly wait to see what this talented group of women is going to come up with this time!

Sunday, March 6, 2011

Quilting To Abstraction

 I took two great classes while I was in Hampton last week--both of them with Gloria Loughman.  The second class focused on creating an abstract wall hanging  Of course, I prepared ahead of time and, of course, I had to re-order my thinking and start all over again after she explained what we were actually going to do.  Here you can see in the first drawing that we just drew some random lines across and down the paper.
 We then filled in the lines with designs of our choice (many of which I changed after I moved from paper design to fabric.) I also bought some new fabrics at the show after I realized the kind of piece I was going to make.
 Once I had my color pallette chosen, I started cutting out the shapes from the freezer paper and ironed them on the right side of my fabrics.I then cut out the fabric about a 1/4" out from the edge of the freezer paper.   The next step was to add a piece of tear-away underneath and sew the layers together about 1/8" away from the freezer paper edge.  Then, off came the freezer paper to be used again as the pattern for the individual app;ique designs--a very cool process.
Once all of this was done, it was time to sew the entire piece
together.  First you had to determine which section went on top of the other .  You would iron under the seam allowance for the pieces that went on top, fit the two pieces together and, using the blind hem stitch and invisible thread, sew the layers together.


As you finished each section, it began to take on a different look (like more cohesive perhaps?)

This is what it looked like with all of the individual pieces done.
                                                                 
This is how the piece looks after joining all of the seams.  I still have to add the borders and do the top stitching--as well as the quilting.  Gloria actually told us to do the top stitching BEFORE joining the pieces but since I had never done this technique and wasn't really confident that the pieces were all going to fit together as planned, I waited until afterwards.  It really doesn't matter on a piece this size but it definitely would be better to do it first on something larger.
This was a class that I really enjoyed--it's such a freeing way of approaching an abstract design and I'll definitely do more of it. 

Thursday, March 3, 2011

Eight Quilts For Your Consideration

There were so many truly spectacular quilts at the Mid-Atlantic Quilt Show this year that I would be hard-pressed to show all of them.  So I'm just going to show eight of them (the quality of the photographs has a little something to do with it!).  This first one is Sheep Wannabees by Debora Kochinsky.  What doesn't show clearly in this picture is the fact that the animals are made from bits of wool--and are kind of fluffy.  Definitely a novel approach.
 This is Thistles by Mary Ramsey Keasler.  I just think it's so beautiful and really makes the thistles look real.
Calamari Time by Karen Bue Lohrenz.  She captures the feeling of movement and dimension.  And the use of color is so perfect.
 This is The Solace of Persephone.  The flowers are made out of velvet.  It was difficult to refrain from touching it--but the quilt police were definitely in the vicinity.
 Elephant's Trunk Nebula by Ann Harwell.  This reminded me of some of the beautiful pictures that I have seen that were taken of outer space.
 Little Peace in 2 4 D by Martha Hall.  I loved the precision of this piece.  I would never have thought to zig-zag the strips.  How cool.
 Pandora's Box by Barbara Swinea.  This photo doesn't really do this quilt justice.  The base fabric looks as if a light is shining from the center of the back.  Barbara is from Asheville and consistently makes beautiful quilts.
Witches Brew by Cathy Wiggins.  This quilt is so much fun to look at and to read the Witches Brew Recipe that you might forget to notice just how much work went into its construction. 


So, these were some of my favorites at the show.  You probably would have had different favorites--but that's what makes the world go round.  I hope you enjoyed these.