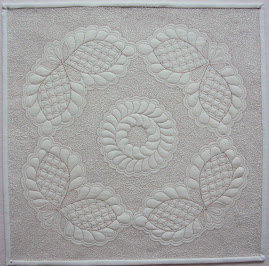
Well, as you can see, I finished my new sample for my Quilting Feathers Demo at the Asheville Quilt Show this Friday. I hope if you have the chance, you'll come to the Quilt Show this weekend at the Fairgrounds near the Asheville Airport. I was fortunate to assist in the judging for the show last Thursday and I saw some beautiful quilts.
Anyway, I had a really grand time quilting this sample--except for one thing. The backing used had a sort of raised painted design (like on some of the white fabrics) I didn't really realize it when I choose it for a backing because it didn't jump out at me: however, once I started quilting, it was another story entirely. It wanted to grab the quilt--really badly. I am now in the market for a Super Slider.
The following three pictures show the details. In the first picture, I made the feathers the way I have been doing them until lately (I don't make them so "regular" all the time now). And the second closeup shows the Diane Gaudynski method. I purposefully didn't trace any of her designs because I wanted it to come out of MY head, but I really like the way that she separates the individual feathers--thus eliminating the need for so much backtracking.
The last closeup is a stencil that I traced. I then drew a circle around the outside of it and added the little cushion quilting on the inside of that, emphasizing the curve of the feathers. And, NOW, I'm ready for Friday. Hope to see you there.
Welcome
Welcome to my blog. I'm glad you stopped by to see what these Musings are all about. Since they're straight off the top of my head, I haven't exactly figured it out myself! We all muddle through each day and, hopefully, we find something to rejoice in as we choose, sort, piece and quilt our beautiful stashes of fabric.
Please visit my website: http://www.judithheyward.com/ to learn more about my quilts. Or contact me at judyheyward@gmail.com if you have any questions or comments. Thanks.
Please visit my website: http://www.judithheyward.com/ to learn more about my quilts. Or contact me at judyheyward@gmail.com if you have any questions or comments. Thanks.
Monday, September 24, 2012
Saturday, September 22, 2012
More Dyeing

Our lesson this week in Three Ways To Dye was Discharge Dyeing. Discharge Dyeing is basically controlled removal of color from a previously dyed piece of fabric. With these first two samples, I put a 1/2 yard of soaked PFD fabric on stretchers and painted several colors of dye onto it--red, orange, yellow, green, blue & purple. After the dyes had set and the fabric was washed and dried, I tore it in half lengthwise. With the first piece, I used the blunt end of a foam paint brush. I dipped the brush into Clorox Bleach Gel and then pressed it onto the cloth. Dip and Press, Dip and Press, etc--being sure to wear gloves because the bleach could really burn the skin if it came into contact with it. After the bleach had removed however much color I wanted it to, I washed it in warm water to halt the process and then washed it in warm water and dish soap. This method I liked and saw some potential in it.
This second sample used the method of squeezing the gel directly from the nozzle of its container. As you can see, I didn't do so well with it. It was heavy and, in this exercise, I had the fabric again attached to the stretchers--only, as it turned out, not tightly enough. The bleach tended to roll to the low point--which was the center (the top of the fabric in this photo) so I had a LOT in that one area. Not pretty--not pretty, at all.
In this last sample, I took a dry, previously dyed fat quarter and accordian-folded it from the narrow side, securing the top with clothespins. I then poured about 1/2" of the Clorox Bleach Gel into a small container and set the fabric into it (with the clothespinned side up). After about 30 minutes, I removed it, rinsed, washed and dried it. This photo doesn't really show it to its best but I really loved this process and see a lot of ways I could use it.
So, that's it for this week in the dyeing world. This coming week, we working with potato dextrin. What's that, you say? I'm guessing it's not instant potatoes!
Wednesday, September 19, 2012
From Whiskey Sour to Lemon Delight
Looking back, one of the reasons I was in such a grand funk this past winter and spring was the failure I experienced on a piece that I had taken almost a year to bring to fruition--and which I loved. I had the perfect fabrics and I had executed it to the best of my ability. It is the lenten rose. My mother-in-law had loved Lenten Roses (which aren't a rose but bloom around the time of the Lenten season). And when we bought the house where we are now living, there were large Lenten Rose plants in the yard. I definitely heard a quilt calling my name. And when I had completed the top, I was so happy--and I could hardly wait to start quilting it. I decided to try a silk batting which I had never used before and I also decided to do some really tight running stitch quilting on the flower petals. When all was said and done, it was a disaster. No amount of blocking could take the resulting ripples away. Simply put, I was devastated. After a month--or more--I decided to cut the quilt apart and use the center as a covering for a walnut bench that had been my grandparents'. It made my heart lighter to know that I was connecting my past with my present--just a bit.
And MUCH later, I took the leftover parts of the quilt and made two small quilts which I call Resurrection I and Resurrection II. I really like these two small pieces and now my heart is glad again. The original piece is gone but, at the same time, it is still here. I have since remade the quilt (called Lady in Waiting). I don't like the fabrics as well but I feel as if it is a step in recovering balance--learning from my mistakes and moving forward. I don't know if the silk batting was the culprit but I think that it was the combination of that and the type of stitch that I used (you may be able to see it in the small lower piece). I changed both the batting and the stitching in my replacement piece and I'm hoping that someday I can dye a piece of fabric that I'll love as much as the Ricky Tims piece that is now gone.
So, I have moved from Whiskey Sour to Lemon Delight. And here is a recipe for Lemon Delight--which is so good even though it leans heavily on modern food chemical technology (who said dessert had to be healthy?).
Lemon Delight
1 Cup Flour
1 Stick butter or margarine, softened
1/2 cup nuts
1 cup powdered sugar
8-oz cream cheese
1 9 oz. cool whip
2 pkgs instant lemon pudding
3 cups milk
Toasted chopped pecans
For the crust, combine flour, butter and 1/2 cup chopped nuts. Pat mixture into bottom of 8 x 12" pan. Bake at 300 degrees for 15 minutes. Cool. For the 2nd layer, combine powered sugar and cream cheese and mix well. Add 1/2 of the cool whip and spread over cooled crust. For the 3rd layer, combine the pudding and milk together (with mixer) and pour over layers when mixture has thickened. For the 4th layer, spread the remaining Cool Whip on top and sprinkle with toasted nuts.
Friday, September 14, 2012
Feathers
Recently, I became aware of the SewCalGal blog--www.sewwcalgal.blogspot.com/. It's a pretty interesting site and I was particularly interested to discover a tutorial there by Diane Gaudynski on quilting feathers. I decided to follow it to learn her technique and see how her method differed from mine. This picture shows a freehand method that I quilted in her style. The differences are this:
1. She quilts both sides of the center spine in one action.
2. She leaves a small space between each feather.
3. She quilts up one side of the spine and then comes back down the same side with echo quilting.
4. She varies the size of the individual feathers and adds some decorative touches inside some of them. (I was already beginning to vary the size of the feathers.
She has a LOT of good tips in the tutorial--well worth a look-see.
So, I decided to make a whole-cloth wallhanging that will incorporate her techniques. I'll be doing a demo at the Asheville Quilt Show at the end of this month (on Friday 9/28 @ 10:00a.m.) and want to have this at least mostly finished by then. As you can see, I have used both her method and mine. This is a fairly intricate piece and I'm really looking forward to trying a new method.
In this photo, I've transferred the design onto a pale blue batik. It's not drawn as darkly in some areas because the blue pen was running out. But I can see it well enough to work. How to transfer to a design to fabric? There are many ways, of course. I haven't tried the paper method yet but I think it might get in my way in a piece like this one.
What I did was to lay the design on a white-top table and trace the center motif onto the fabric--with markings for where the four feather designs would go. Since it was difficult to see through the blue fabric, I then transferred over to the light box and traced the design--moving it around as needed and using the markings to position it. If I had a huge light box, I would have used it from the fbeginning So, this is my project for the next week or so. But FIRST, I have to decide on which thread to use--always somewhat of a challenge.
And, finally, I learned last night that my Summer Soiree
quilt won Best Machine Quilting at the Pennsylvania National Quilt Extraveganza! I am thrilled.
Wednesday, September 12, 2012
I'm Dyeing To Share Some More
My main disappointment from class #1 was that too much of the undyed fabric color remained after the dyeing was completed. Marji suggested that I might try to be a little more bold in my dye application.
A couple of years ago I bought the book Tray Dyeing . I had been fascinated by the wonderful effects obtained by dyeing fabric in trays; however, I was somewhat intimidated by some of the measuring techniques and terms in this book. Now, having a little more experience under my belt, I took the things I've learned in Marji's class and combined them with some of the things in the Tray Dyeing book.
When I was in Staples the other day, I came across the perfect "tray" container (pictured below). It measures 13" x 9 " x 3"--and already has a top to cover the dyed fabric while it "cures" (Do I get Staples Rewards for plastic containers? One can hope.). So . . .I cut 3 pieces of prepared fabric into 42" squares. I properly wet each one and folded each into an accordion shape (as I did with the class piece). I then laid each of these in the container with the edges of the fold perpendicular to the bottom of the tray ( you just keep turning the fabric as you get to the opposing sides of the tray). After all of the fabric was positioned (and it will hold at least 3 1/2 yds), I began pouring the dyes--which were tourqouise, yellow and a purplish color--all over the fabric. I sort of tried to determine where the overlapping colors could make more colors. I poured a LOT of dye. I then covered the tray for about 1 1/2 hours and the first piece is the result.
For the second piece, I used the technique I used for the
Hurricane piece. I swirled a 42" square around and around, put it in the tray and poured the dyes, trying to make the yellow the center and working out from there with red and tourqouise. I love this piece even though it somewhat hearkens back to some Arlo Guthrie concerts I've attended.
So, now I'm on a roll. I guess I need to order more fabric.
Sunday, September 9, 2012
I'm Dyeing To Show You
I like to take classes at Quilt University http://www.quiltuniversity.com. They offer such a variety of techniques that there is really something for everyone. This is the 3rd dyeing class that I've taken with Marjie McWilliams. The things I like about her classes are:
1) I like her work
2) Her techniques and formulas are easy to follow
3) The results are satisfying
4) She is "present" for her class, offering assistance when needed and giving compliments and encouragement to maintain the level of interest.
The name of this class is Three Ways To Dye and it takes you a little beyond the basics. All three of these samples used a spray bottle to apply the dyes. The first sample was a little more complex because you had to pin the muslin to a frame before you sprayed and then cover it (without the plastic touching the dyes) for about 1 1/2 hours.
All 3 samples used a basic batch of red, blue and yellow dyes (mixed separately and each put into a spray bottle) The idea of the 1st piece was to spray the red and blue on the sides and then spray the yellow in the center with some overlapping to create green and orange tones.
The 2nd sample was pleated into an accordian and then each dye sprayed across the top. and the 3rd sample was twisted in a circular motion. It was supposed to have orange, green and purple tones. I got brown instead of purple--but I still was happy with the result.
I LOVE to buy hand-dyes when I go to quilt shows and I keep hoping that someday I'll know enough about dyeing fabric to achieve the results that appeal to me in the ones I buy. I'm definitely not there yet, but the journey is a lot of fun.
Saturday, September 8, 2012
Taking The Trunk To Florence, SC
No . . .not really a trunk. Just 4 large suitcases. I went to Florence, SC to present a Trunk Show at the Swamp Fox Quilters monthly meeting on Thursday. To say I had a great time would be an understatement. These folks roll out the hospitality and warmth in large doses. I would say that it was Southern Hospitality but it was more than that because there were women from many parts of our country.
To begin with, I stayed in the beautiful home of Karen and Jim Kirkland--native Iowans (is that a word?).
This is Karen. And see that smile on her face? It was there the entire time I spent with her. What a nice person and gracious hostess. And, to be honest, I kind of drooled over her studio. It was wonderful and was a great place to express her creativity.
I have posted 3 of her quilts here. They are not the BEST quilts that she had in her studio; however, they were the ones that I took the best pictures of (not one of my better camera days).
But what these photos DO show is how great she is with color. And one of her favorite colors is purple--a choice I can definitely identify with. And did you notice the tiny log cabins in the second quilt? Patience and precision--in large doses.
It's always gratifying when your quilting audience shows an interest in the quilts you are showing them. I think that this group may have been exceptional. When I present my trunk show I always tell people to ask me questions as I go along so I can be sure that the answers will be given at the time that the question occurred. Well, they asked LOTS of questions and, ultimately, I think the presentation ended up more as a conversation--and that was truly wonderful. So . . .hopefully, I good time was had by all. I know I did.
Tuesday, September 4, 2012
Here I am--once again
Well, this is the my blog posting since last January. And Blogger has changed! So . . .we'll see how I do.
I stopped blogging in January because I felt as if things were sort of topsy-turvey in my life and I just needed to step back and live one day at a time. I knew my husband had more heart surgery coming up and several other things were on the horizon of my life. Also, I was still recovering from the 3rd move in less than two years. I learned that moving that many times in such a short time was really too much for someone that is experiencing one of those less-than-youthful years.
Oh well, all that is to say that things are more settled now and I feel like I am anchored in this place. My husband DID have more heart surgery (to not much beneficial effect), I have had two hand surgeries (to somewhat beneficial effect) and many things are not as great as I would like them. So what else is new? I bet you could give more or less the same report for your own life. But, we're breathing, right? And I have begun to miss writing about my quilting life and other things that have meaning to me. So, here goes.
One really great thing that has happened to me lately is that I am once again a member of an art group--a bunch of great women called The Boxers. And what this means is that we strive to work OUTSIDE of the box. I haven't been a member of the group long enough to know all of the individual talents of each person but I've been a member long enough to know that each person is nice. At this point in my life, that means a lot. For example, the other day we were working on a group project and a problem with the construction arose (which was essentially my fault). We were able to talk it through, come up with a solution and STILL enjoy the time together. What more could you ask?
That's really enough for today except that I'll post a couple of picture of some of my latest work.
This first small quilt is named Dreamy Flowers. It is a pattern that I have for sale. I'll be going to Florence, SC on Thursday to present a Trunk Show and really wanted to have something new to offer. For me, this is a really good example how how you can take a fairly simple design and make it dramatic through color choices. I had a really great time with it.
 This second quilt is named Sticks and Stones and is my contribution for the Silent Auction at the Asheville Quilt Show at the end of this month (Please come if you can--it's a wonderful show with great vendors.). For this quilt I cut apart a diamond background-- that I had sewn for something else and it didn't work--and used part of it. I added the fabric strips, circles, couched yarns and beads, My husband said it looked like pick-up-sticks and fireballs. I named it Sticks and Stones because of the rest of the poem. I did a large orange peel quilting on the background and was really happy with the way it made all of the diamonds blend together. This year all of the money raised in the Silent Quilt Auction will go to the Quilt Guild Fund that pays for charity quilts. We provide SO many quilts and some of our sources for batting and fabric are no longer there, so this will be great.
So . . .that's all for now. Glad to be back.
I stopped blogging in January because I felt as if things were sort of topsy-turvey in my life and I just needed to step back and live one day at a time. I knew my husband had more heart surgery coming up and several other things were on the horizon of my life. Also, I was still recovering from the 3rd move in less than two years. I learned that moving that many times in such a short time was really too much for someone that is experiencing one of those less-than-youthful years.
Oh well, all that is to say that things are more settled now and I feel like I am anchored in this place. My husband DID have more heart surgery (to not much beneficial effect), I have had two hand surgeries (to somewhat beneficial effect) and many things are not as great as I would like them. So what else is new? I bet you could give more or less the same report for your own life. But, we're breathing, right? And I have begun to miss writing about my quilting life and other things that have meaning to me. So, here goes.
One really great thing that has happened to me lately is that I am once again a member of an art group--a bunch of great women called The Boxers. And what this means is that we strive to work OUTSIDE of the box. I haven't been a member of the group long enough to know all of the individual talents of each person but I've been a member long enough to know that each person is nice. At this point in my life, that means a lot. For example, the other day we were working on a group project and a problem with the construction arose (which was essentially my fault). We were able to talk it through, come up with a solution and STILL enjoy the time together. What more could you ask?
That's really enough for today except that I'll post a couple of picture of some of my latest work.
This first small quilt is named Dreamy Flowers. It is a pattern that I have for sale. I'll be going to Florence, SC on Thursday to present a Trunk Show and really wanted to have something new to offer. For me, this is a really good example how how you can take a fairly simple design and make it dramatic through color choices. I had a really great time with it.
So . . .that's all for now. Glad to be back.
Subscribe to:
Posts (Atom)


